Experience a Production-Grade Kubernetes Platform Locally
In this tutorial, you will learn how to use kubefirst CLI to deploy a new production-grade Kubernetes cluster locally in minutes using k3d, with the most popular cloud native tools.

In this tutorial, I will show you how to use our CLI to deploy a new Kubernetes cluster in minutes, with the most popular cloud native tools running on your machine. We will deploy a new cluster locally, and we will explore some of its most useful features. With our new functional cluster containing already a lot of goodies, you will learn a bit more about the GitOps principles with your new "source of truth repository”, use Terraform with Atlantis to create new repositories within your management cluster, add a new user in HashiCorp Vault using code only, surf the Argo CD sync waves, and master the magic steps to deploy a new application in the cloud.
Let’s jump right through this K8s fun!
Before we start
Before you start this tutorial, if you prefer to watch it instead of reading, you can do so by viewing the recording of the Cloud Native Islamabad workshop I did a while ago. The additional explanations may differ from the text to the video format, but the exercises are the same.
If you just want to see k3d in action (the technology we are using for the local kubernetes platform) while learning more about it, we are having Thorsten Klein, creator of k3d in our livestream later today. Join us live (or watch the recording after) to ask us any questions.
First Things First
Before you can run your own Kubernetes cluster locally, you need some basic prerequisites.
Installing the kubefirst CLI
To do so, you need to use Homebrew. If you don't have Homebrew installed on your machine, but want to use it as it’s the simplest method, read their documentation. If you don't want to use it or are not on MacOS, you can read more about alternative ways to install the CLI.
brew install kubefirst/tools/kubefirstIf you already have our CLI installed, be sure you are using the latest version, as you’ll need at the minimum 2.1.5 for this tutorial. Here’s how to upgrade:
brew update
brew upgrade kubefirst
Installing Docker Desktop
To be able to run k3d locally, you need a virtualization software installed. We officially support Docker Desktop, so we suggest you install it as it’s free and available on all operating systems. You may try with alternatives like Podman or Rancher, but you may run into some problems. If it’s the case, please create an issue in the kubefirst repository or join our Slack community where we can help you.
Creating your GitHub Token
To be able to deploy all kubefirst functionalities, we need to create two Git repositories: the gitops repository (derived from our upstream gitops-template repository—the end result repository will be specific to your cluster) which is crucial, and the metaphor one, which is an example application useful to understand the platform capabilities.
For this tutorial we will use GitHub, but you could use GitLab if you prefer by following the proper instructions in the documentation. To let kubefirst have access, you need to create a token, and export it as an environment variable. Once you have the token, run this command in your terminal:
export GITHUB_TOKEN=ghp_xxxxxxxxCreate Your New Cluster
Creating a cluster is pretty simple: it’s one command. For this tutorial we will use your GitHub username, but if you prefer to use an organization, rather than your personal account, you need to use the flag `--github-org` instead of `--github-user` one in the command below.
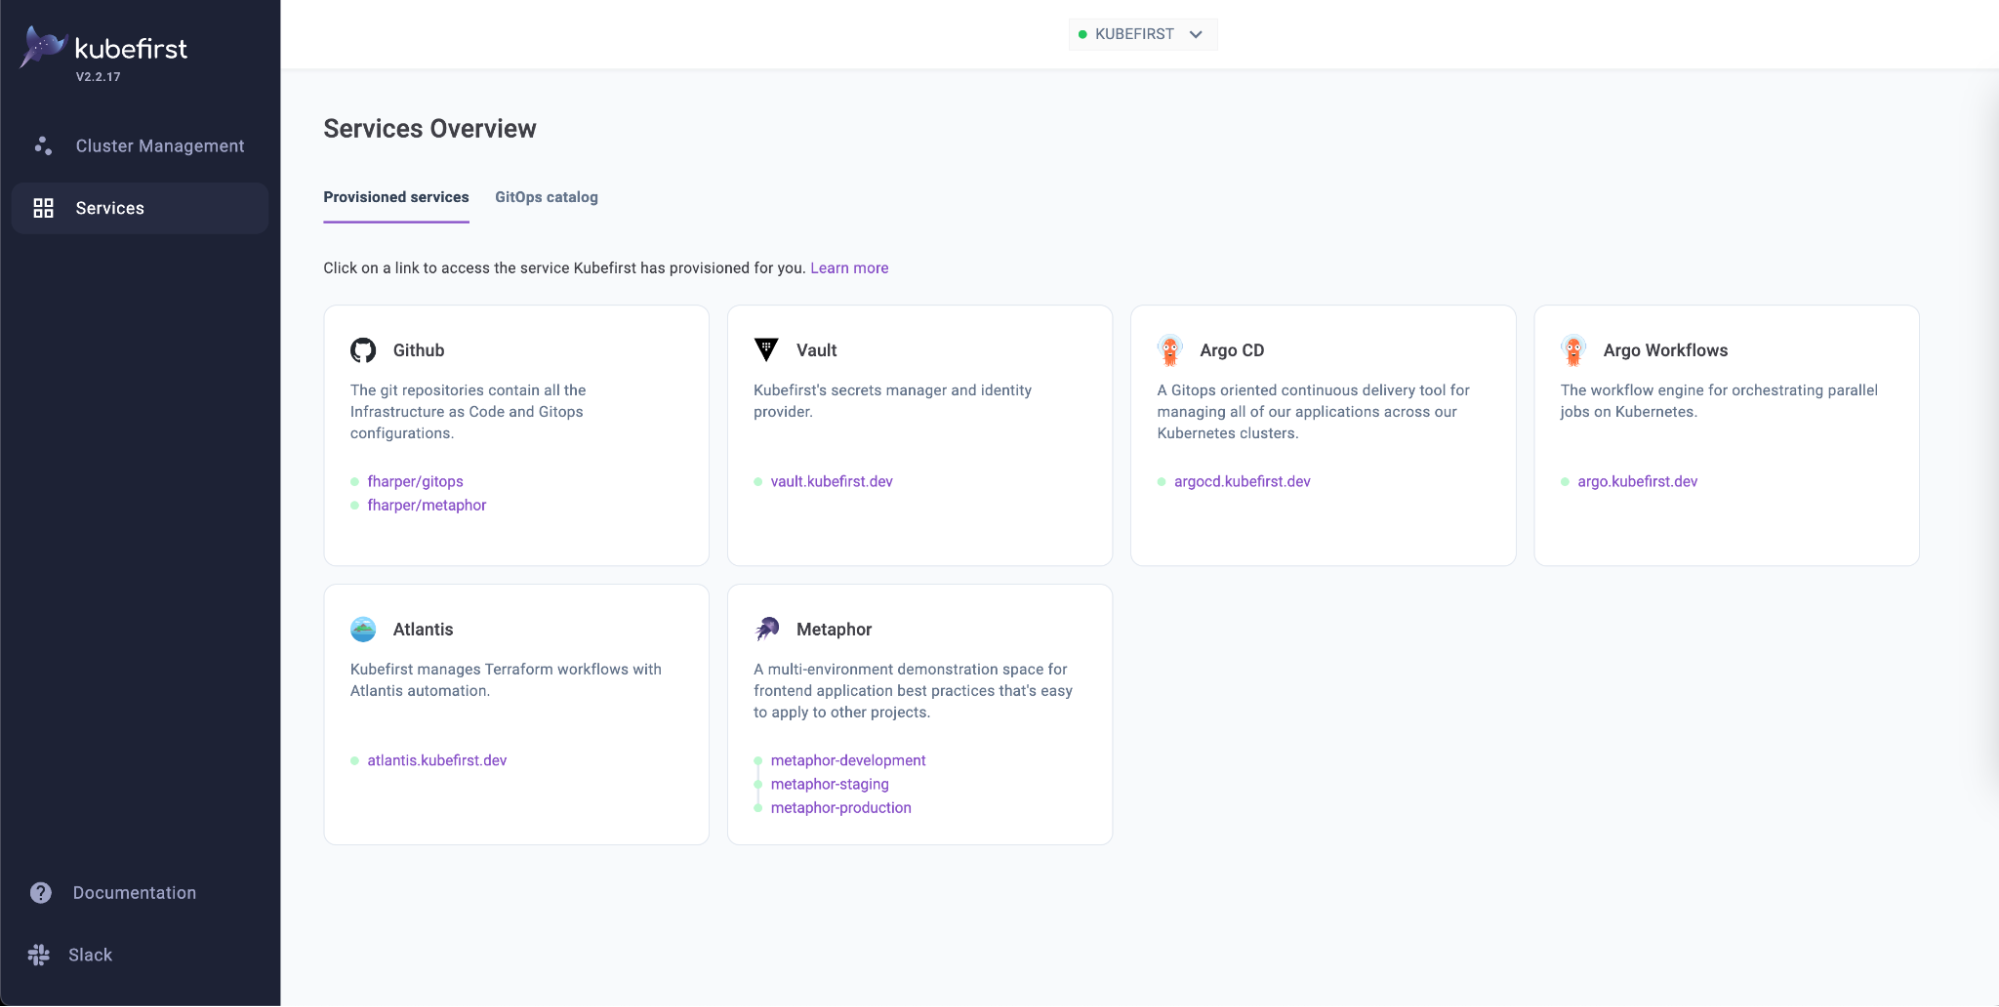
kubefirst k3d create --cluster-name kubefirst --github-user <your-username> --git-provider githubIt will take about 10 minutes to create the cluster, depending on your laptop resources, and your internet connection. Feel free to do something else while it does, like reading our documentation or watching any of our latest Kubefirst Live episodes. You will know when your cluster is ready as a new tab pointing to our console application, which you can see as your new cluster dashboard, will be open automatically in your default browser at https://kubefirst.kubefirst.dev/services.
Add a New Repository

Managing your Git repositories in Terraform is a great way to control source code access and settings in one place. To do so, open the `gitops` repository that was created for you at https://github.com/<your-username>/gitops/. Navigate to the terraform/github/ folder and add a new module in the repos.tf file. You can copy, and paste an existing one, but be sure to change the module name, and the repo_name property. Do not merge directly into main: you need to create a pull request, which is important as we will use Atlantis to run the Terraform plan.
Alternatively, you can do the same steps using the command line instead of the GitHub web interface with these commands:
git clone git@github.com:<your-username>/gitops.git

vi terraform/github/repos.tf
# copy and paste an entire module, change the module name,
# and repo_name value for your new repository name.
# Save, and quit.

git checkout -b new_repo
git add terraform/github/repos.tf
git commit -m "Adding a new repository to GitHub"
git push -u origin
If you have the GitHub CLI installed, you can create the PR with the following command:
gh pr createIf not, open the branch in your browser, and create the pull request from the GitHub web UI.
Applying the plan using Atlantis

If everything goes well, Atlantis will formulate a plan of what needs to be done to create your new repository. You can see the details by expanding the “Show Output” toggle. To apply the plan associated with your pull request, comment atlantis apply, and see the magic happen. Once it’s done, you should see three new comments (one mentioning the plan was successfully applied, one about merging the pull request as all plans were applied, and one sharing the state of the finalized plan and locking mechanisms). Your new repository will also be created for you.
If you are familiar with Terraform, you probably wonder why we are not using the Terraform CLI to create our new repository instead of having to use the GitHub web interface. Using Atlantis requires you to create a pull request, which means that someone else, in a real-case scenario, would need to approve it before you run the atlantis apply command. It adds an additional level of review and control that you wouldn’t have if you run Terraform from the modified file from your computer. It also ensures that your modifications will be in the gitops repository, in case you may forget to commit your local changes after. Lastly, it is keeping a trace of what changes within your ecosystem, and it makes it easier for anyone else on your team to grasp the whole story, and make any changes or even revert if anything goes wrong. All in all, it is respecting the GitOps principles.
Add a New User

By default, we create one admin user named kbot. We’ll show you how to retrieve its password a little further, but as you know, you will need to create the proper authorization for everyone on your team that needs to have access to different applications on your cluster. We got you covered as you can also easily add a new user to the admin or developers group with kubefirst. The process is similar to the one of adding a new repository. This time, navigate to `terraform/users/` and uncomment the module developer_one in the developers.tf file. Once it’s done, create a pull request as we will also use Atlantis to apply the changes.
Alternatively, you can also do the same steps in the terminal by using the following commands:
vi terraform/users/developers.tf
# uncomment the developer_one module. Save, and quit.

git checkout -b new_user
git add terraform/users/developers.tf
git commit -m "Adding a new user to my cluster"
git push -u origin
If you have the GitHub CLI installed, you can create the PR with gh pr create. If not, open the branch in your browser, and create the pull request from the GitHub web interface.
Applying the plan using Atlantis
At this point, you know what to do: write a comment with the text atlantis apply, and see the plan being applied. After the successful run of the plan, you can validate it worked by login into Vault at https://vault.kubefirst.dev.
To do so, you need to retrieve the generated password for your new user. Go back to the terminal, and run the kubefirst k3d root-credentials command which will provide you with Argo CD administrator password, the default administrator user (named kbot) password, and what we need right now, the root token for Vault. We could also use the user kbot to access Vault.

With that token, you can now access Vault. Navigate to users and done (or the username of the user you just created).

Unless you change the username in the Terraform file, you can now sign off from HashiCorp Vault, and log back, but this time, by using the username done and the password you just retrieved. You will notice that the content from Vault is different: it’s because we used the root token previously, which gives you access to everything Vault, while the new user we just created is in the developer group, which has some limited access to the secrets stored in Vault.
It’s important to note that with any other cloud supported by kubefirst, the kbot user, and any newly added users will be able to be used to connect to any kubefirst installed applications requiring a username/password. For k3d, we never implemented that feature, so the users can only log into Vault, and for Argo CD, you can only use the admin user with the password you retrieve before. It’s one of the only differences between the local, and cloud experience.
Add a New Application
Of course, you can add any repositories or users you want, in the end what matters the most is making this new cluster yours, by installing the applications or services you need to be successful. That's why the last part of this tutorial is all about that!
Firstly, download the flappy-kray.yml file (or keep this link open in your browser). We will use this to add a new application using GitOps principles. Now, let’s go back to the gitops repository in the browser, but this time navigate to the registry/kubefirst folder. Create a new file named flappy-kray.yml past the content from the downloaded file. If you want to do this from the terminal, please check the next “Using the CLI Instead of the Browser” section of this tutorial before proceeding with the next paragraph.
Before you commit the file, you may want to log into Argo CD at https://argocd.kubefirst.dev/ using the admin username, and the password returned earlier by the root-credentials command. Once in the web interface, search for applications with the word flappy so you can notice it does not exist.
Now that you have proof, let’s commit the file to the main branch. In this case, since we are now using Terraform, we do not need to use a pull request to run an Atlantis plan. As we are testing the platform, we can also let ourselves go wild, and commit directly to the branch without a pull request, which I know you wouldn’t normally do… right?

As usual, you can do the same in your terminal of choice with these commands:
vi registry/kubefirst/flappy-kray.yml
# Copy the content from the file you downloaded. Save, and quit.
# Alternatively, you can just move the file you downloaded in the registry/kubefirst/ folder.

git add registry/kubefirst/flappy-kray.yml
git commit -m "Adding a new app called Flappy Kray"
git push -u origin
Once the new file is in main, what will happen next is a bit of the GitOps magic. By default, Argo CD syncs every three minutes, which means it will check the state of the GitOps repository, in our case, the registry/kubefirst folder content. It will then compare this to the actual state of the cluster, and will remove, change, update or install applications to ensure that there’s no cluster drift; in other words, that the cluster reflects the gitops repository. Hence why we say that the Git repository is the source of truth when it comes to GitOps.
If you don’t want to wait, you can manually fire a synchronization which you want to do inside of the registry application, since we are using the app of apps pattern. To do so, use the “SYNCHRONIZE” button, and click the “SYNC” one inside the sidebar that just opened.
In a second or two, you will see the registry showing its out of sync in two ways: one at the top showing information about current and last sync status.

The other way is by looking directly on the registry application node.

Since we didn’t change much, you should nearly instantaneously see the flappy-kray application, and the Ingress component being installed by Argo CD.


If you click on the little arrow in the square button on the flappy-kray application, you will be transported to the application view, where you can see all components needed to run the application, syncing, and being installed.

Since Flappy K-Ray isn’t a complex application requiring a lot of external components, you should see all these folks becoming green in a minute. Once it’s done, we need to make sure that the game is accessible outside of the cluster. The usual way, especially for testing purposes, would be port-forwarding using `kubectl` or a tool like `k9s`, but if you gave a closer look to the file we added, there’s already an Ingress Route using Traefik. Please note that Traefik is only used in the k3d version of kubefirst: on the cloud, it’s managed with Nginx.
apiVersion: traefik.containo.us/v1alpha1
kind: IngressRoute
metadata:
  name: flappy-kray
  namespace: kubefirst
spec:
  routes:
    - kind: Rule
      match: Host(`flappy-kray.kubefirst.dev`)
      services:
        - name: flappy-kray
          port: 80
  tls:
    secretName: flappy-kray-tls
The game should be available at https://flappy-kray.kubefirst.dev but if you try it now, you’ll get a certificate issue, so we have one thing left to do: add a certificate to make the connection secure. To do that, we added a useful command that does everything in one single command:
kubefirst k3d mkcert --application flappy-kray --namespace kubefirstNow, you can now access Flappy K-Ray, and beat my poor score. By the way, if you play the game, share a screenshot of your score by tagging us (@kubefirst) on Twitter, and if you are in the top three scores for the month, I’ll send you some cool kubefirst swag!

As of 2.2, you can also add new applications to your cluster by using the GitOps Catalog. It is not available yet for k3d, but will be in 2.3, which should be released soon 🎉
Conclusion
As you saw, in about 10 minutes, we were able to create a fully functional Kubernetes cluster running locally with tools like Argo CD, Argo Workflows, Vault, Terraform, Atlantis, and a lot more. They are all already working together, while providing you a `gitops` repository to manage your cluster respecting the GitOps principles, which, by the way, is yours to do whatever you want to do. With an additional 10 minutes, we also created a new repository that should be tied to our project, added a new developer with proper accesses and permission, and deployed a new application in just a couple of simple commands or with some minimal user interface manipulations.
This is just one example of the power of the kuberfirst platform as you can also create a new cluster on AWS and Civo. We also introduced beta support for Google Cloud, Vultr, and DigitalOcean. Lastly, we introduced an amazing UI in 2.1 to make your life even easier (k3d is only available with the CLI), and trust me, it’s only the beginning.
As always, we are on our Slack community if you need any help or just want to say hi. We also welcome any constructive feedback or feature suggestions: we firmly believe that our community feedback is the only way we can continue to give you a better user experience, so, tell us what you think!
With that said, happy local platform building 🎉