Self Hosting GitLab Server on Kubernetes with Kubefirst
This article is going to walk through leaving the SaaS GitLab ecosystem and replacing it with a GitLab server that you host on kubernetes.

Git Providers for GitOps Platforms
When creating GitOps systems from scratch, one of the first things you'll want to do is get your gitops repository established in an accessible space so that you can begin to run your IaC and GitOps orchestration to build out your platform's infrastructure and apps. When starting from scratch there's an easy way and a hard way to do this.
The easy way to start from scratch is to lean on SaaS. Both GitHub and GitLab offer SaaS variations of their git hosting providers, each with valuable and capable free tier offerings. All you need to do is create a free user account at github.com or gitlab.com, create a new organization/group, and then you can create a gitops git repository to house the IaC and GitOps that you'll need to create and manage your new platform and its infrastructure.
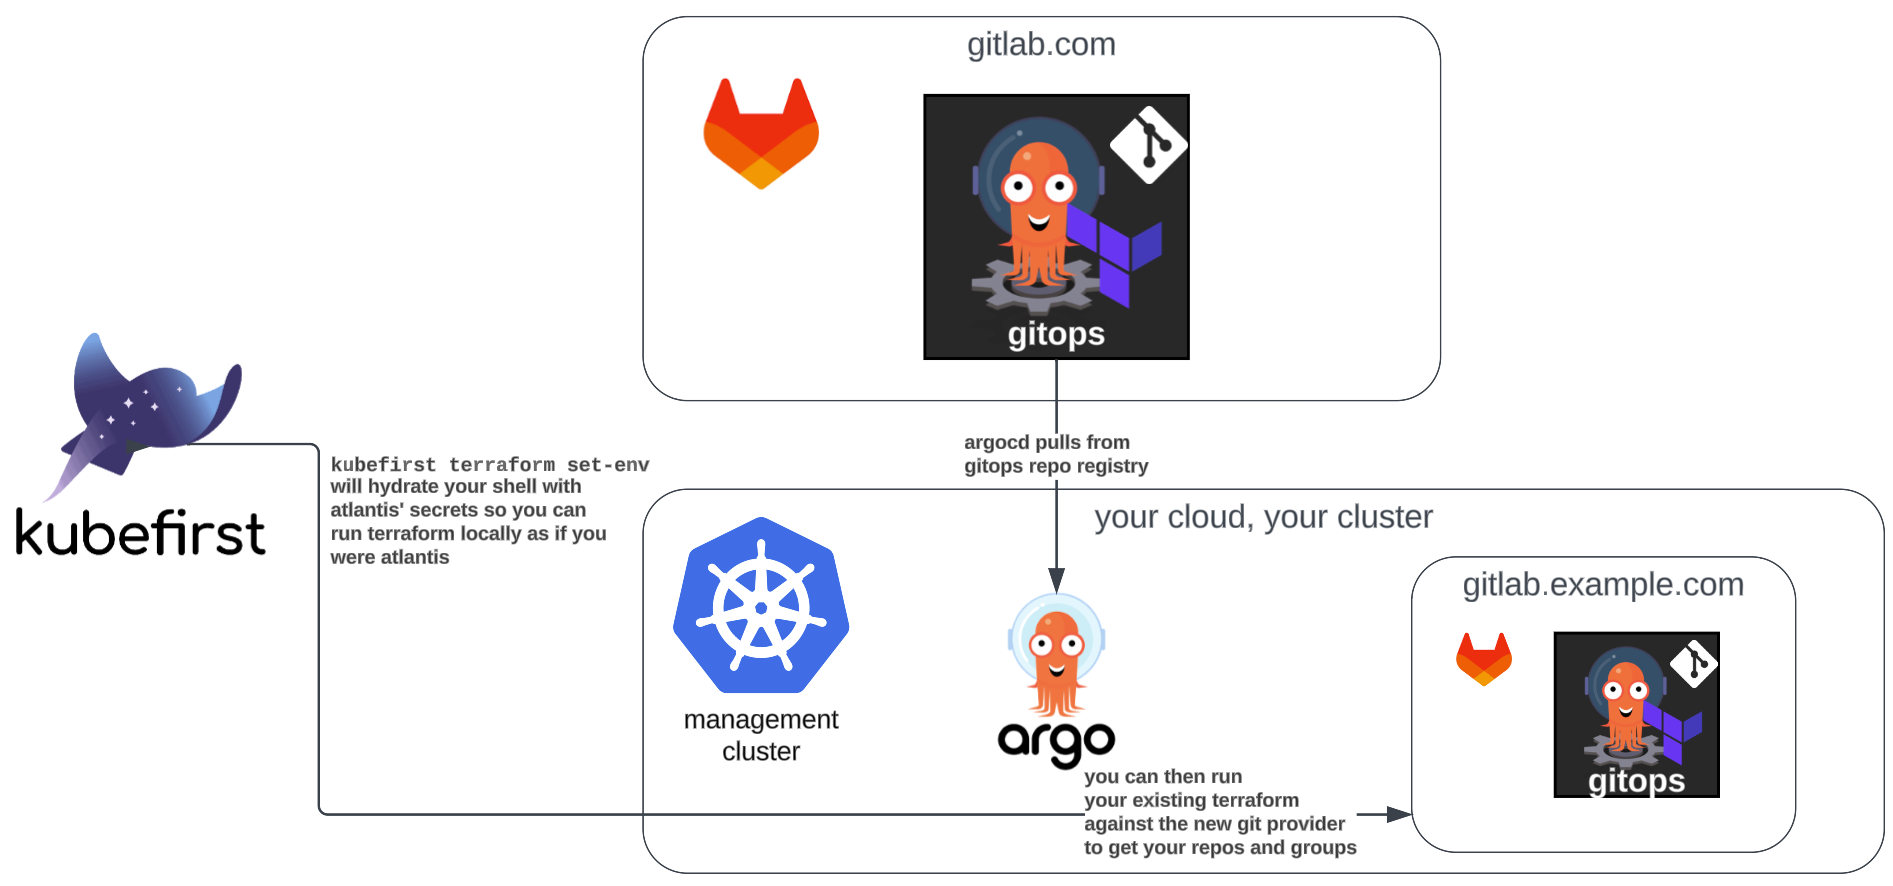
When Kubefirst offers you a GitHub or GitLab variation of the platform, it's the SaaS version of the git provider that we use to host your new repository. However, what if you wanted to host the git server yourself?
Our Livestream Covering this Blog Post
A brief aside before we begin: we recently had a livestream covering this topic if you'd like to follow along step by step with us!
Starting out on GitLab SaaS
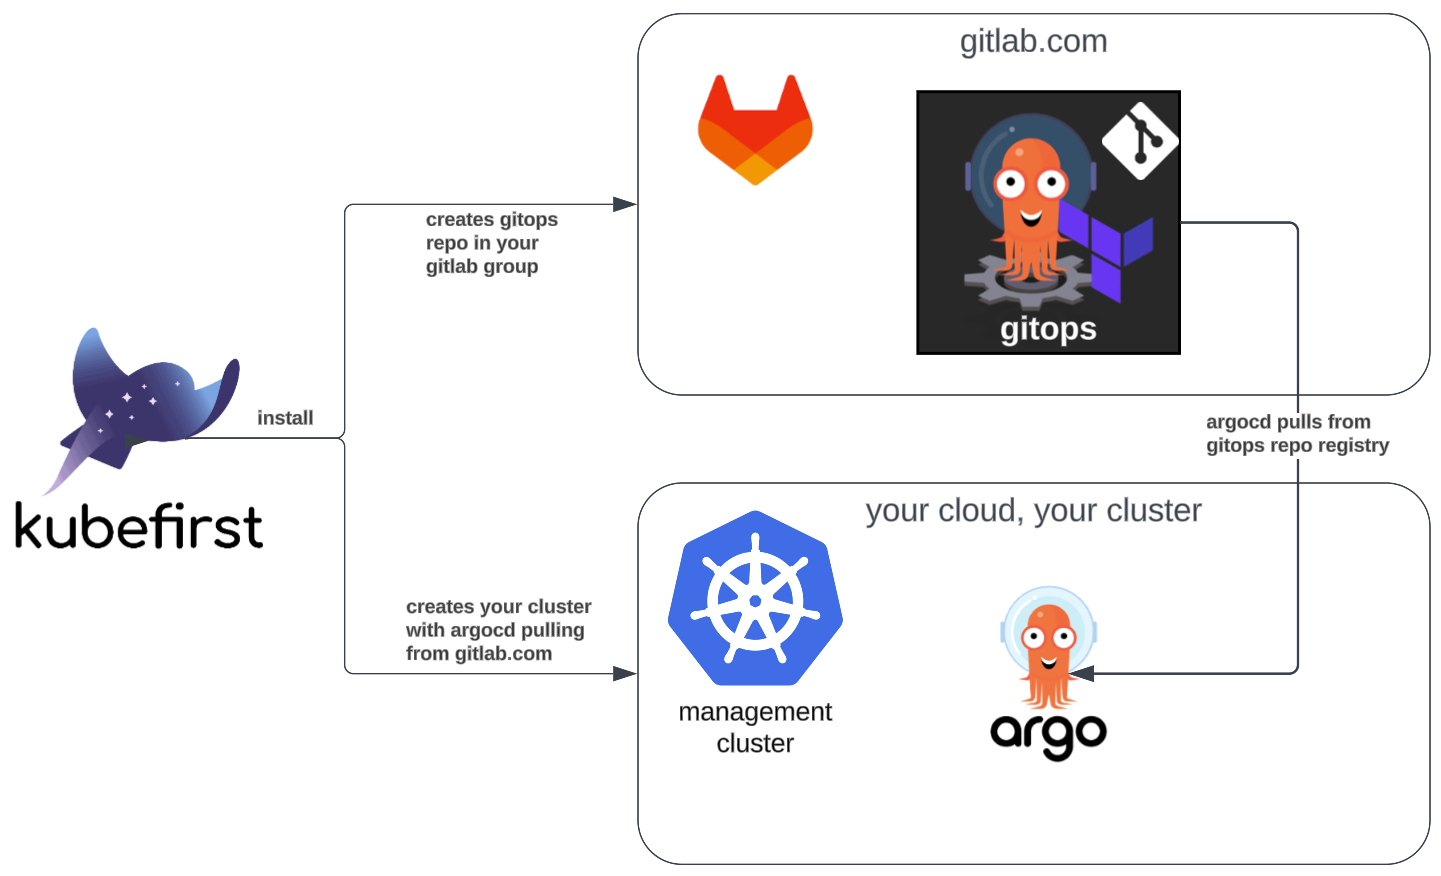
When you create a GitLab version of the kubefirst open source platform, a few things will be set up for you automatically:
- 2 repositories added to your GitLab group (
gitops&metaphor) - 1 user will be added to your admin group that's associated with your SaaS GitLab user
- Self hosted GitLab Runners will be automatically created and registered with your GitLab group so jobs can be run on your own infrastructure
- RBAC rules will be established such that Argo Workflows can be invoked by your self hosted GitLab Runners
- Argo CD's registry will be bound to your new SaaS
gitopsrepository and credentials established for access
The remainder of this article is going to walk through the process of leaving that SaaS GitLab ecosystem, and replacing it with a GitLab server that you host and manage yourself in kubernetes. The same concepts apply to GitHub enterprise if you were to self host that as a GitHub shop.
Self-hosted GitLab Server on Kubernetes
Single Sign On
The first thing you'll want to do is establish a new OIDC client so that your kubefirst platform users can have single sign on to their new GitLab server that we're about to create.
The kubefirst platform will come with a few OIDC clients already created for you for the argo, argocd, and kubefirst apps. We're going to want to create one more client to use with your new GitLab server instance.
In order to do this, go to your new gitops repo, and pull request an update to your gitops/terraform/vault/oidc-clients.tf file. add the following snippet, replacing <YOUR_DOMAIN> with your domain's value, such as example.com.
module "gitlab" {
  source = "./modules/oidc-client"

  depends_on = [
    vault_identity_oidc_provider.kubefirst
  ]

  app_name               = "gitlab"
  identity_group_ids     = [vault_identity_group.admins.id, vault_identity_group.developers.id]
  oidc_provider_key_name = vault_identity_oidc_key.key.name
  redirect_uris = [
    "https://gitlab.<YOUR_DOMAIN>/users/auth/openid_connect/callback",
  ]
  secret_mount_path = "secret"
}
When you pull request that to main, Atlantis will automatically show you the plan of it creating a new client in Vault.
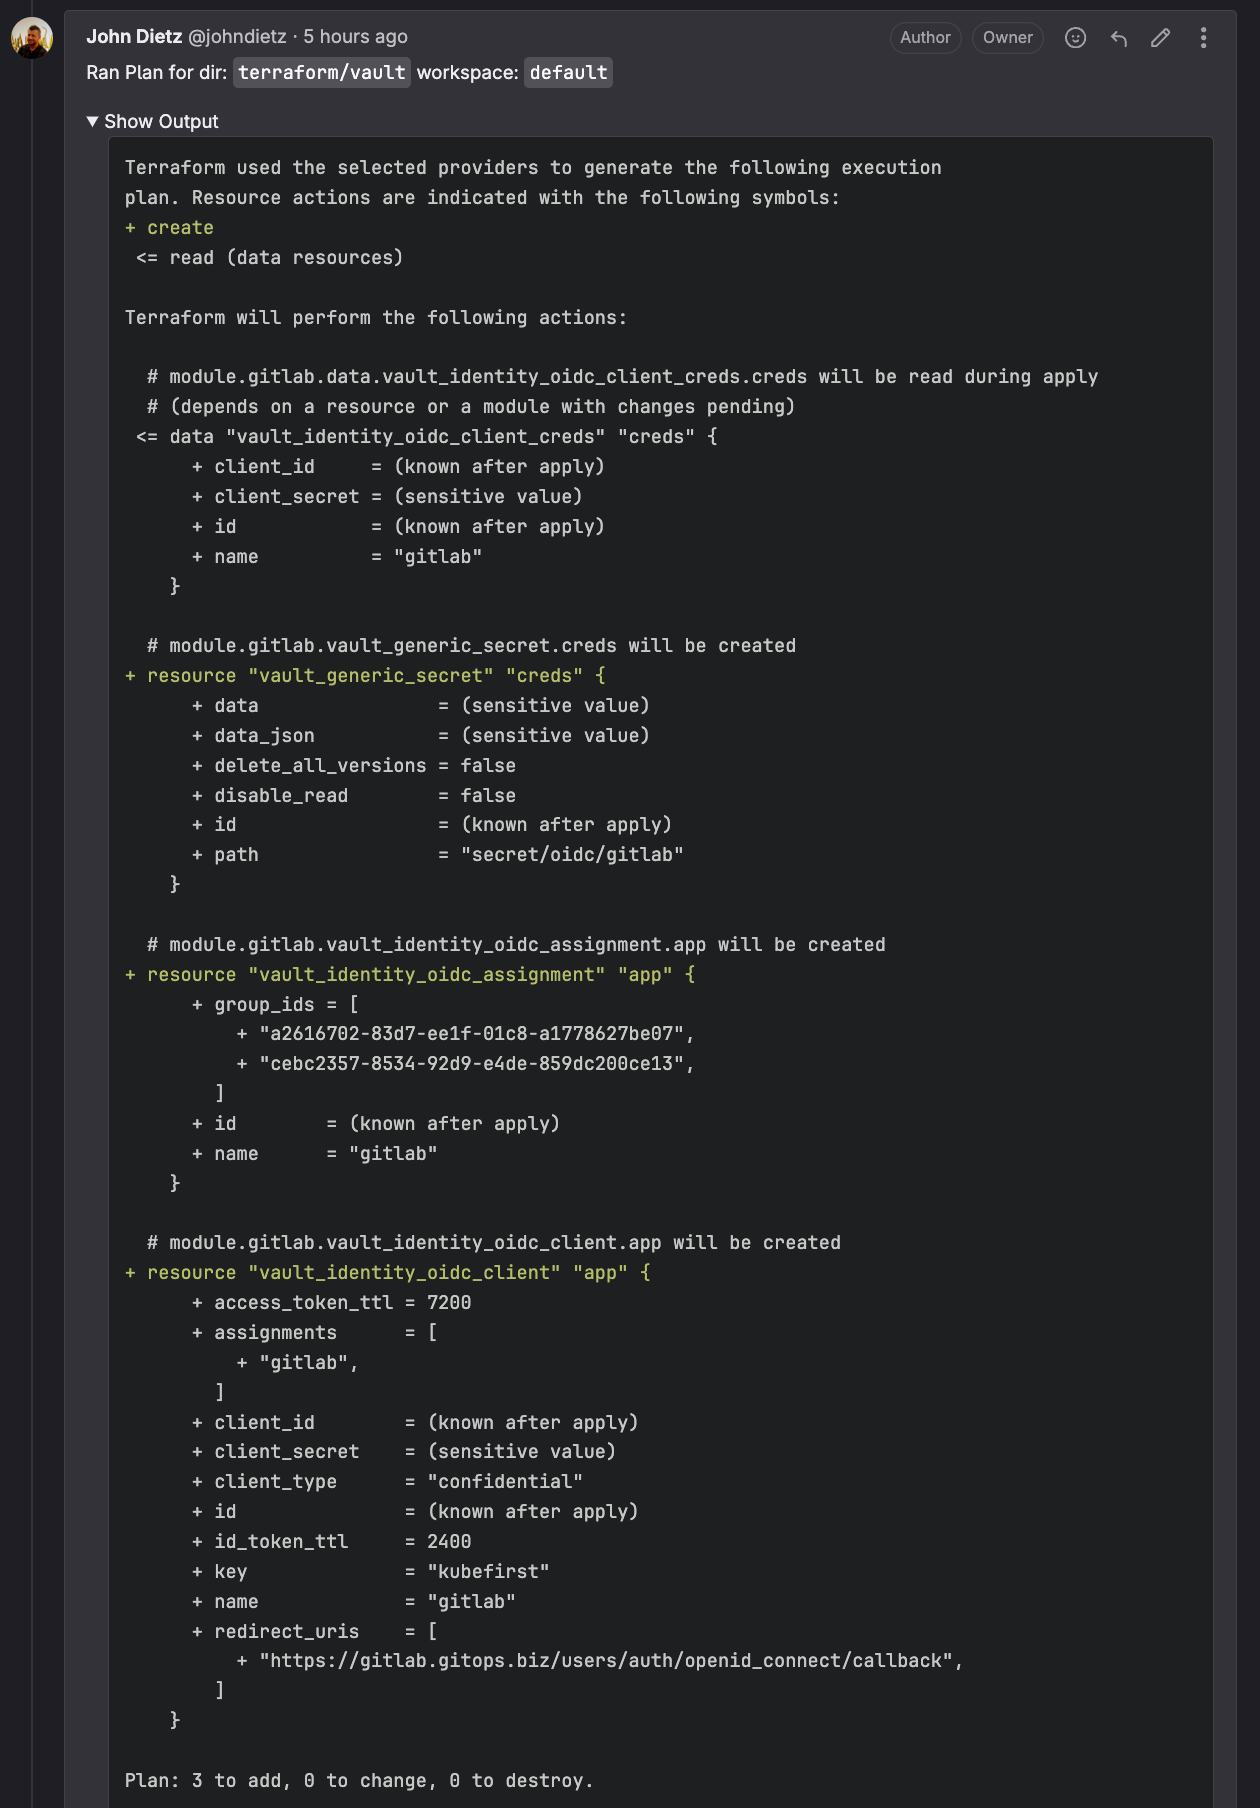
After reviewing the plan and confirming it looks like the above, comment on the pull request with the text atlantis apply in order to get your new oidc client created. This creates the client configuration itself, as well as the 2 secrets that the GitLab app will need to use to leverage it. Now that we have a way to safely log users into GitLab, let's create that self hosted GitLab instance in your management cluster.
Self Hosted GitLab Server
To add the GitLab server to your management cluster, you'll want to add the following file to your gitops repo's /registry/clusters/<management-cluster>/ directory. (replace <DOMAIN_NAME> with your domain in 3 locations)
gitlab.yaml:
# note to the installing admin:
# this app needs a couple prereq steps
# 1. pull request and atlantis apply a new oidc client named gitlab so the secrets are available in vault
# 2. adjust the 3 instances of <DOMAIN_NAME> with just the domain portion of your zone, for example: example.com
apiVersion: argoproj.io/v1alpha1
kind: Application
metadata:
name: gitlab
namespace: argocd
finalizers:
- resources-finalizer.argocd.argoproj.io
annotations:
argocd.argoproj.io/sync-wave: '30'
spec:
destination:
server: https://kubernetes.default.svc
namespace: gitlab
project: default
source:
repoURL: 'https://charts.gitlab.io'
targetRevision: 7.7.3
helm:
values: |-
global:
registry:
enabled: false
appConfig:
omniauth:
enabled: true
# autoSignInWithProvider: openid_connect
syncProfileFromProvider: true
syncProfileAttributes: [openid, email, profile]
allowSingleSignOn: [openid_connect]
autoLinkUser: true
providers:
- secret: gitlab-vault-oidc
defaultProjectsFeatures:
containerRegistry: false
hosts:
domain: <DOMAIN_NAME>
ingress:
configureCertmanager: false
provider: nginx
class: nginx
annotations:
kubernetes.io/tls-acme: true
cert-manager.io/cluster-issuer: "letsencrypt-prod"
tls:
enabled: true
secretName: gitlab-tls
gitlab:
sidekiq:
enabled: false
registry:
enabled: false
unicorn:
registry:
enabled: false
# https://docs.gitlab.com/charts/installation/command-line-options.html#tls-configuration
webservice:
registry:
enabled: false
ingress:
provider: nginx
class: nginx
annotations:
kubernetes.io/tls-acme: true
cert-manager.io/cluster-issuer: "letsencrypt-prod"
tls:
enabled: true
secretName: gitlab-webservice-tls
webservice:
registry:
enabled: false
certmanager-issuer:
email: [email protected]
upgradeCheck:
enabled: false
certmanager:
installCRDs: false
install: false
nginx-ingress:
enabled: false
registry:
enabled: false
# add on later
gitlab-runner:
install: false
chart: gitlab
syncPolicy:
automated:
prune: true
selfHeal: true
syncOptions:
- CreateNamespace=true
---
apiVersion: v1
kind: ConfigMap
metadata:
name: gitlab-vault-oidc-template
namespace: gitlab
annotations:
argocd.argoproj.io/sync-wave: "10"
data:
provider: |
name: openid_connect
label: Vault
icon: https://www.pngitem.com/pimgs/m/329-3299659_hashicorp-vault-logo-hd-png-download.png
args:
name: openid_connect
scope:
- openid
- profile
- email
- groups
response_type: code
issuer: https://vault.<DOMAIN_NAME>/v1/identity/oidc/provider/kubefirst
client_auth_method: basic
discovery: true
uid_field: email
client_options:
identifier: "{{ .client_id }}"
secret: "{{ .client_secret }}"
redirect_uri: https://gitlab.<DOMAIN_NAME>/users/auth/openid_connect/callback
---
apiVersion: external-secrets.io/v1beta1
kind: ExternalSecret
metadata:
name: gitlab-vault-oidc-template
namespace: gitlab
annotations:
argocd.argoproj.io/sync-wave: "20"
spec:
secretStoreRef:
kind: ClusterSecretStore
name: vault-kv-secret
target:
name: gitlab-vault-oidc
template:
engineVersion: v2
templateFrom:
- configMap:
# name of the configmap to pull in
name: gitlab-vault-oidc-template
# here you define the keys that should be used as template
items:
- key: provider
data:
- secretKey: client_id
remoteRef:
key: /oidc/gitlab
property: client_id
- secretKey: client_secret
remoteRef:
key: /oidc/gitlab
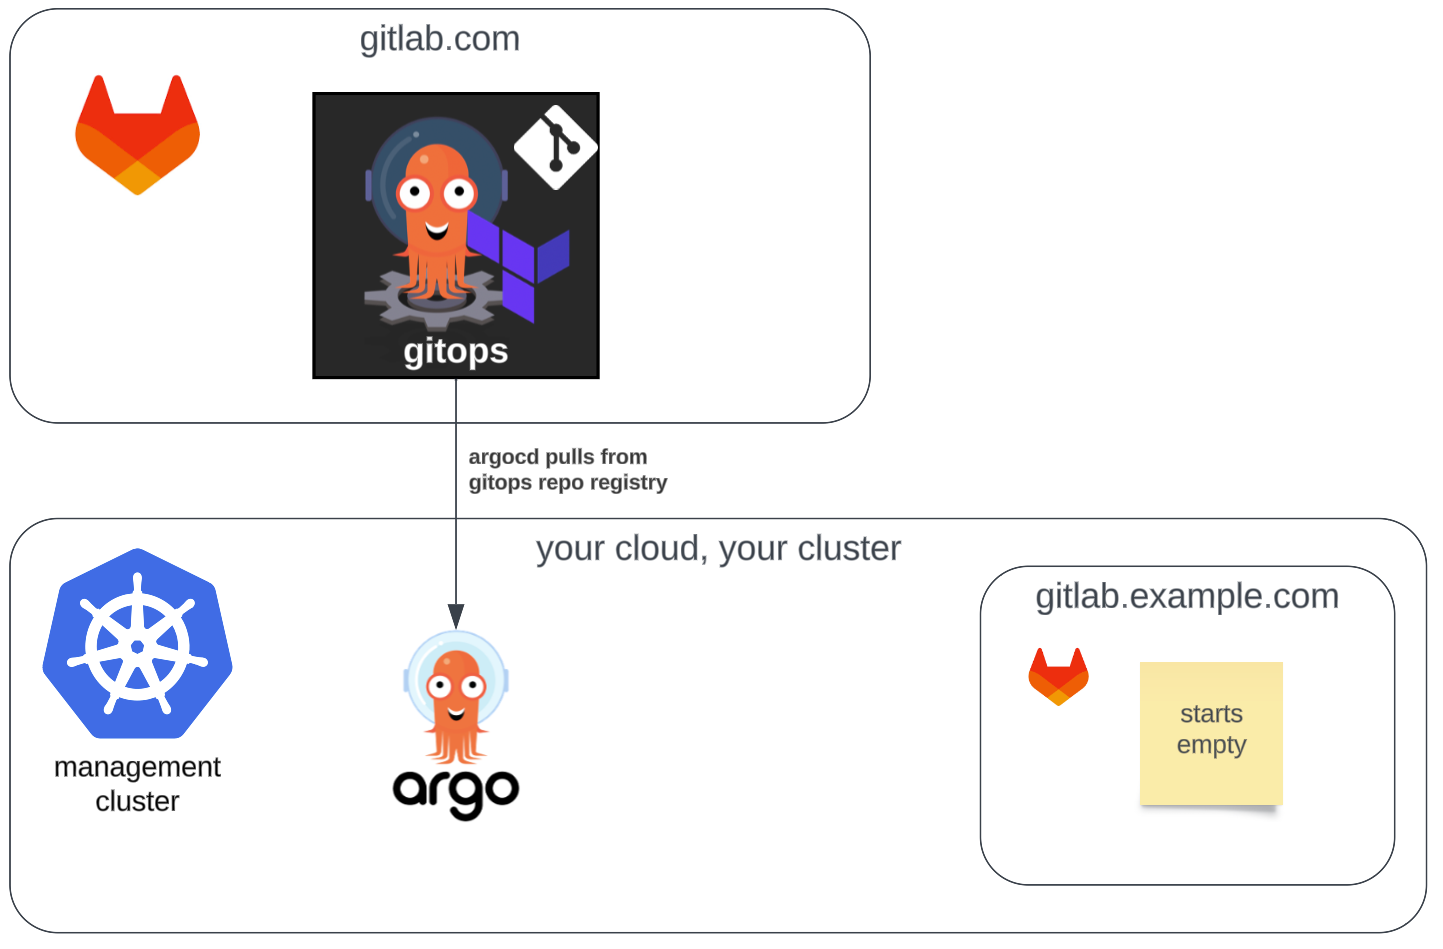
property: client_secretThis does a couple things. It pulls the secret out of vault and creates a new kubernetes secret called gitlab-vault-oidc that's accessible to the gitlab namespace so the new OIDC client can be used for login.
It also creates a new minimal install of GitLab server in your management cluster. If you were to set the helm.values.global.hosts.name to the value example.com, you would end up with your new GitLab server available at https://gitlab.example.com after Argo CD syncs the new app.
Configuring Your New GitLab Server
To get the root password for your new GitLab server, connect to your management cluster and look for a secret in the gitlab namespace named gitlab-gitlab-initial-root-password. That will be the password which you can use with the root user in order to log into your new GitLab server. If your Vault OIDC client is ever not working, this is your backdoor access into the server.
Once logged in, you'll need a new GitLab group and PAT in order to shift the GitOps platform from GitLab SaaS to your new GitLab instance. It's probably best for you to keep the name of your group consistent. For example if you attached your platform to a group named kubefirst in GitLab SaaS you should probably keep it kubefirst in your self hosted instance while you're pivoting.
With this new group selected in the GitLab UI, in the left panel navigation, select Settings -> Access Tokens, and create a new Group Access Token with Owner role for the new kubefirst group. Copy the new token once generated, you'll need it in the next step.
Tell Vault About Your New Git Provider
Hop into your Vault instance, and navigate to your secret named atlantis. We'll need to make 6 changes (5 ~ edit, 1 + add):
~ ATLANTIS_GITLAB_HOSTNAME~ ATLANTIS_GITLAB_TOKEN~ GITLAB_TOKEN~ TF_VAR_gitlab_token~ TF_VAR_owner_group_id(to get this number, hit edit in gitlab when on your group, it will show in the URL)+ GITLAB_BASE_URL:https://gitlab.<DOMAIN_NAME>/api/v4
Save these changes to your secret in Vault. Next we'll run some terraform to hydrate your new Git provider.
Run Your GitLab Terraform Against Your New Git Provider
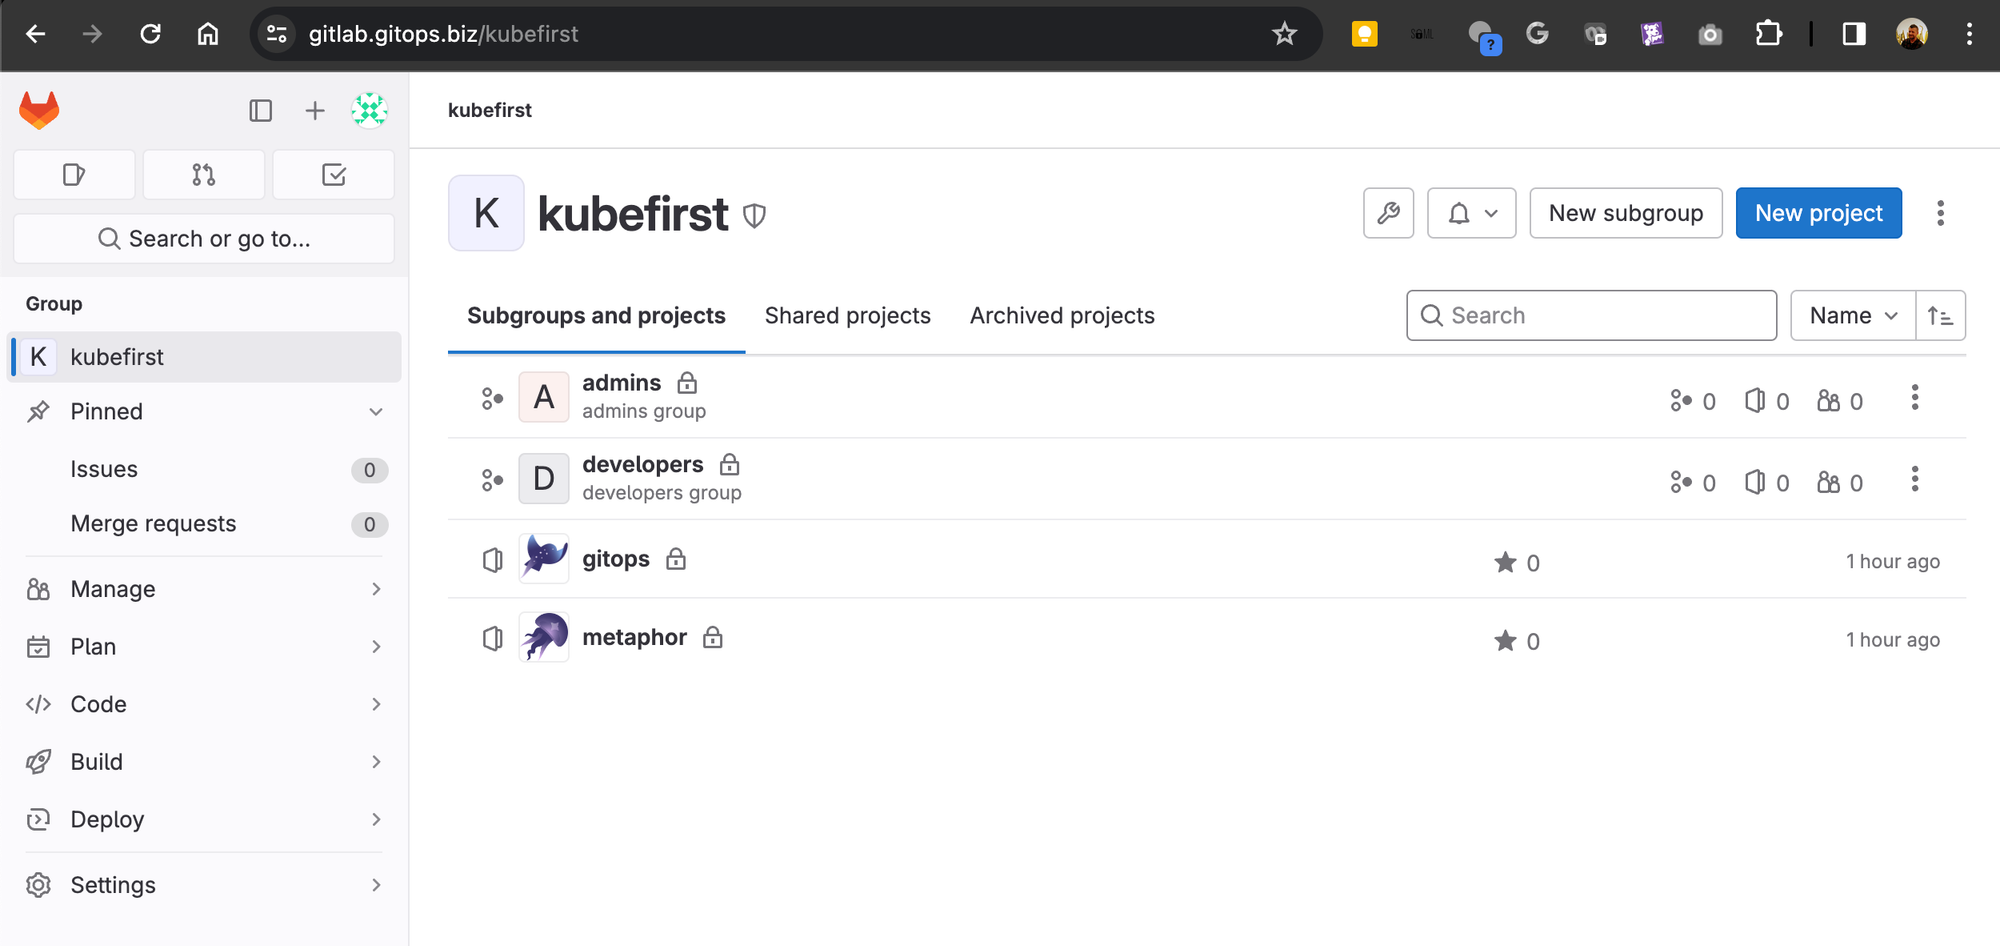
You've probably noticed by now that there's no gitops or metaphor repository in your new GitLab server. There's also no developers and admins group like the ones that were set up for you in SaaS during the installation. Let's fix that.
Let's clone your gitops repository from your SaaS environment so it's available locally. Then in your terminal, cd to your gitops repo's terraform/gitlab directory, and run the following (replacing <DOMAIN_NAME> with your domain).
cd gitops/terraform/gitlab
kubefirst terraform set-env --vault-token xxxxxx --vault-url https://vault.<DOMAIN_NAME> --output-file .env
source .env
terraform init
terraform apply
If executed successfully, this will create your groups and projects in your new GitLab server with a result that looks like this.
...

Plan: 7 to add, 0 to change, 0 to destroy.

Do you want to perform these actions?
  Terraform will perform the actions described above.
  Only 'yes' will be accepted to approve.

  Enter a value: yes

gitlab_group.admins: Creating...
gitlab_group.developers: Creating...
module.metaphor.gitlab_project.project: Creating...
module.gitops.gitlab_project.project: Creating...
gitlab_group.admins: Creation complete after 2s [id=7]
gitlab_group_share_group.admins: Creating...
gitlab_group.developers: Creation complete after 2s [id=6]
gitlab_group_share_group.developers: Creating...
gitlab_group_share_group.developers: Creation complete after 2s [id=2:6]
gitlab_group_share_group.admins: Creation complete after 3s [id=2:7]
module.metaphor.gitlab_project.project: Creation complete after 6s [id=2]
module.gitops.gitlab_project.project: Creation complete after 6s [id=1]
gitlab_project_hook.atlantis: Creating...
gitlab_project_hook.atlantis: Creation complete after 1s [id=1]

Apply complete! Resources: 7 added, 0 changed, 0 destroyed.
With a successful apply, you'll have the same git repos and groups in your self-hosted GitLab as you had managed in GitLab SaaS.
Migrating Argo CD GitOps Repos
This is probably the trickiest part of the operation. Argo CD is managing the entire platform and is pointed at the original gitops repo at gitlab.com to sync with the configurations of the platform apps.
The goal of this transition is to:
- Setup the new permanent
gitopsrepo - Change the new repo to their new permanent values (Argo CD isn't looking here yet)
- Setup Argo CD to connect to the new repo
- Change the old repo configurations to match the new repo configurations
- Watch as the registry wakes up, finds its new repo to sync against, and shifts all app configurations over to the new repo
- Destroy the old repo
Setup the New Permanent gitops Repo
Go back to your local cloned gitops repo (which you recall you cloned from the original SaaS git provider). Open it up in VSCode or whatever your favorite multi file editor is. Let's globally replace all instances of gitlab.com with gitlab.example.com (adjust for your domain).
To get everything on a single protocol, let's also change all ssh configs to https variations so replace [email protected]:kubefirst with https://gitlab.example.com/kubefirst. This protocol shift will give us one less thing to keep track of. Let's save this content locally and git add and git commit the changes.
To setup Argo CD to be able to access the new gitops repo, go to Settings -> Repositories -> Connect Repo. Then select https, git, default, and provide your repository URL. Use kbot as the username and your group PAT as the password.
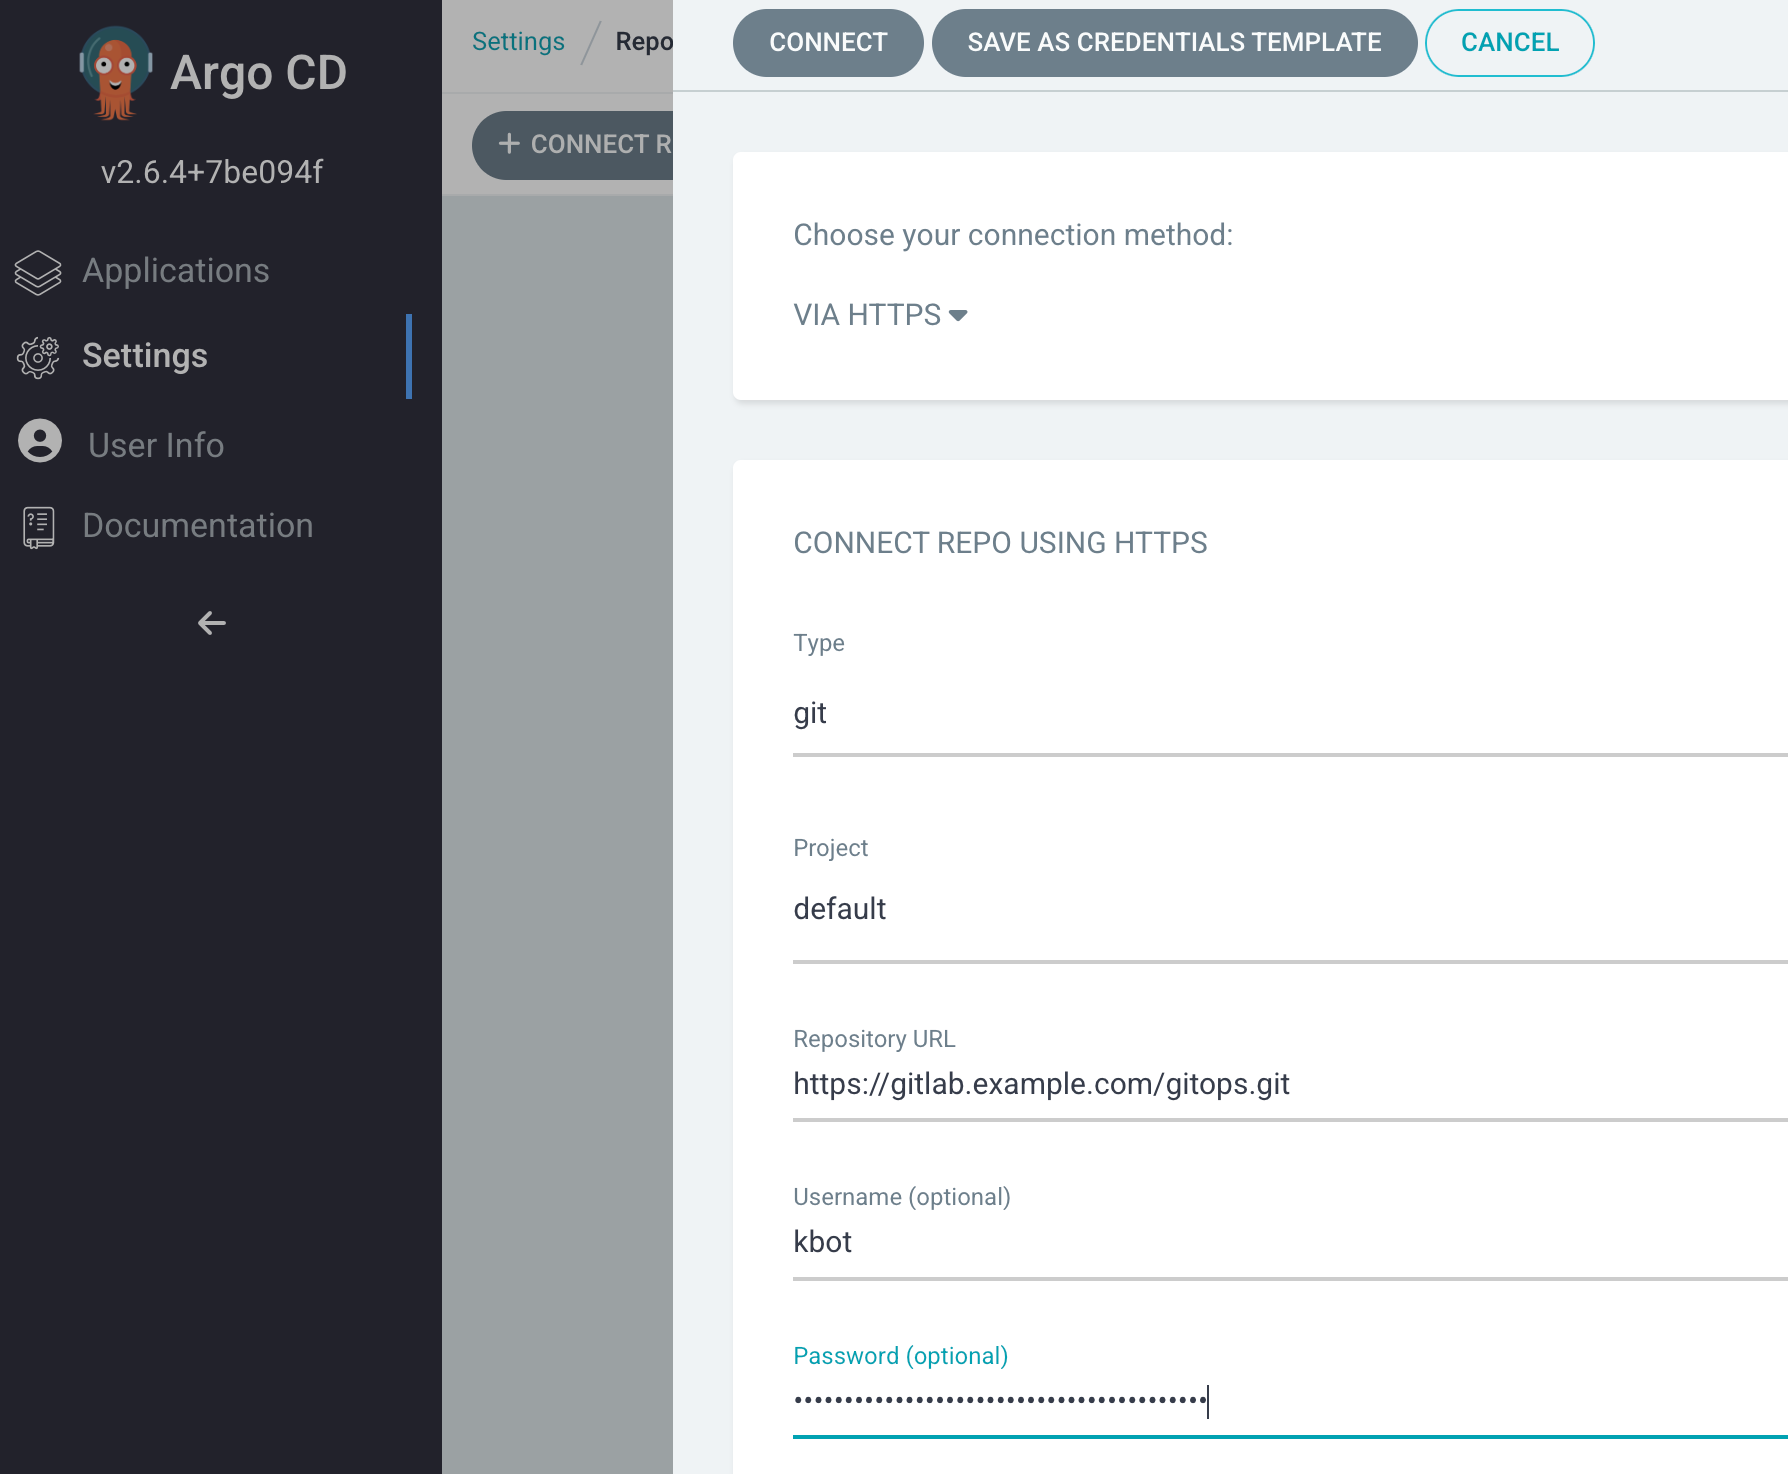
When you hit Connect, ensure you get a green check before continuing.

Now that you've confirmed Argo CD can connect to your new gitops repo, let's get your changes pushed up to your new repo space and then your old repo space.
To push the changes to the 2 repo remotes will require some care. Again, we want to push to self hosted first, and SaaS last. Once we update the SaaS repo, Argo CD will see the change in the saas repo, see that it needs to start looking at the new repo, and then it will bind against the new repo instead.
git remote rename origin old-origin
git remote add origin https://gitlab.<YOUR_DOMAIN>/kubefirst/gitops.git
git push --set-upstream origin --all
git push --set-upstream old-origin
This renamed your old saas remote to old-origin, created a new remote named origin pointed at your new self hosted instance, and then pushed the locally committed changes to both of them.
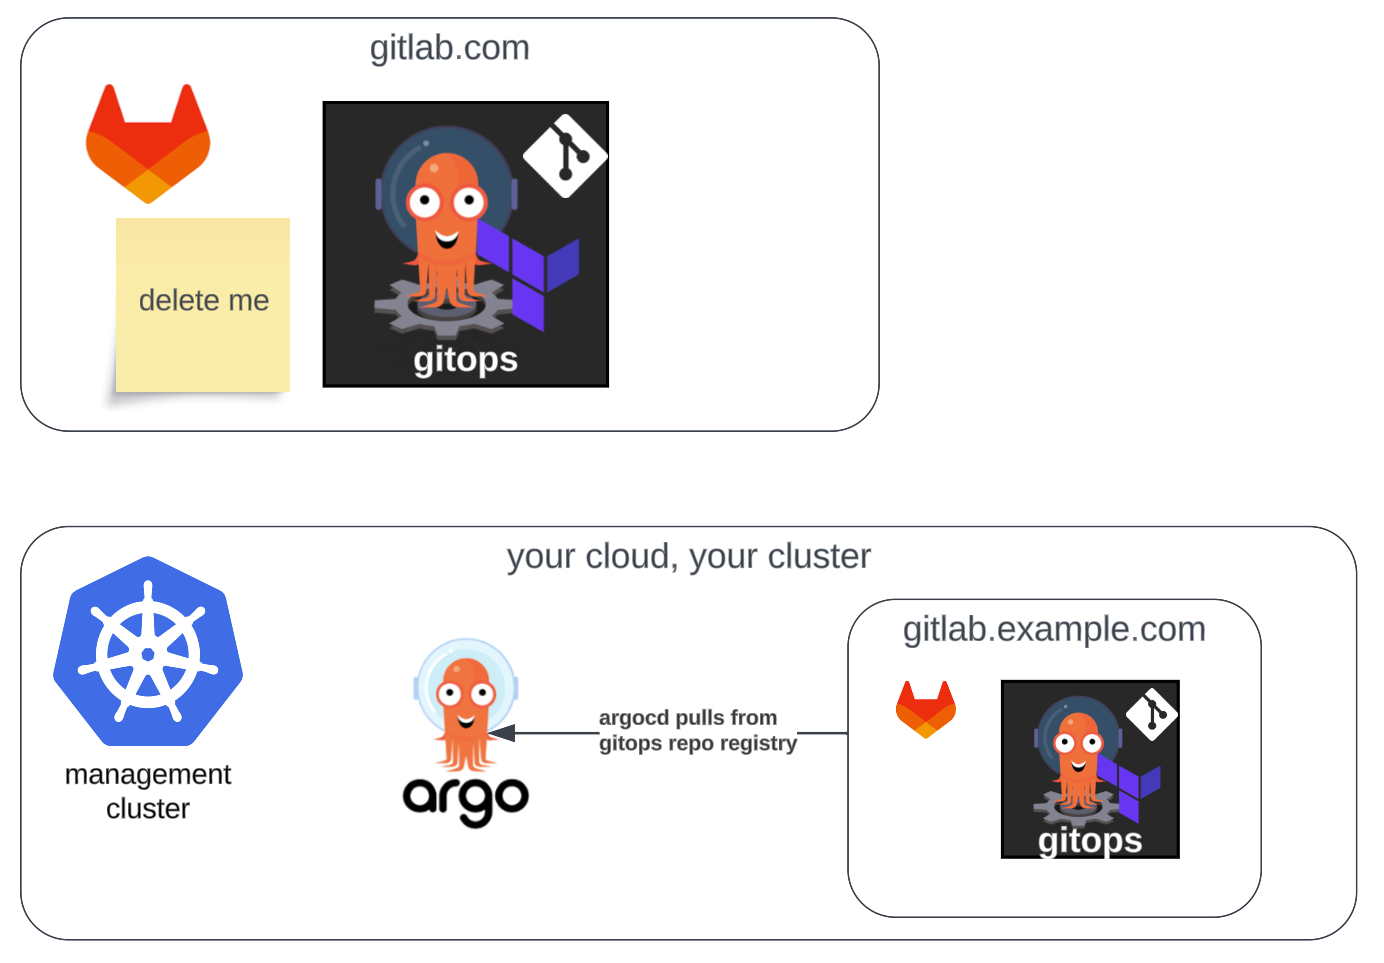
At this point, if you hop into your Argo CD and hit refresh on the registry app, it should connect to your old gitops repo, see that registry should get it's values from the new self hosted gitops repo, pull that new repo content, begin syncing, and continue through that pattern through all of the apps on the platform, until nothing is using the saas version of the repo any longer. Once it syncs through all of your apps, the old repository in gitlab.com is no longer in use, and can be removed.
Try Argo CD GitOps on GitLab or GitHub with Kubefirst
Getting a GitOps platform that's automatically set up with Argo CD, GitLab, and all of the other best in class cloud native technologies has never been easier.
brew install kubefirst
kubefirst launch up
That command will launch your new provisioning UI that lets you create your new open source cloud native infrastructure management and application delivery platform in minutes in all of your favorite clouds.


If you have any trouble, we're here to help. Join our community workspace at https://kubefirst.io/slack - we have hundreds of cloud native engineers who want to be using the same cloud native tools the same ways. Anything at all that you need help with you can for ask in the #helping-hands channel. Hope to see you there!